Resin Nature Rings Tutorial
Welcome to the resin nature rings tutorial!
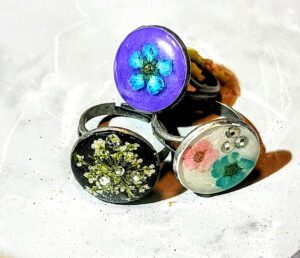
I am a huge fan of dainty rings you can wear with any outfit! So, I had to figure out a way to make my own using epoxy resin and some embellishments I already had lying around the house for other projects. I especially liked the idea of encapsulating dried flowers into the rings as a way of preserving the beauty of nature around us.
After a few failed attempts, I came up with a great method to make the perfect little resin nature rings. Here I will share a video tutorial and an even more detailed written tutorial. I have also included a complete list of the materials needed for this project.
Not only is this a great project to do on your own, but it would also be lots of fun to do with a group of friends. This is definitely a beginner-friendly resin art project, so do not be afraid to try it.
There are not many ways you can screw these little gems up!
Please remember to purchase your project materials using the links provided below if you decide to try this resin ring art project. I publish these tutorials for free, and when you use the links I provide, I receive a tiny percentage of the price you pay. If I do end up making a bit of money, it all goes into materials for the next project that I will always share with you!
Quick Tip on Video Settings
Note: If you feel the video is too fast, click the settings (gear) icon and select Playback Speed. Set the speed to .5 and the video will play slower. (This may only work if you click the YouTube icon and watch the video on the YouTube platform.)
Feel free to screenshot any parts of the video you need, and please leave any questions you may have in the comments below! Have fun, and I can’t wait to hear how your resin nature rings turn out.
Resin Nature Rings Tutorial (Video)
Here is the Resin Nature Ring Tutorial! If you need more detailed instructions, please read the written tutorial below.
If you prefer to read your tutorials, you are in the right place, and we know you will love this nature-inspired resin ring tutorial.
Here are detailed directions to create your very own nature resin rings, as well as a list of materials (each with a link) for all the products you will need to create your own resin nature rings.
Materials for Resin Nature Rings
- Ring Bezels
- Play-Doh or Floral Foam
- Acrylic Paint or Appliance Touch-Up Epoxy
- Embellishments
- Craft Resin
Resin Nature Ring Tutorial (Written)
1. Step One: Preparation
Prepare and Level Workspace, Set up Ring Holders
First, you want to prepare your workspace. Doing this properly will lead to far fewer headaches both during the resin pouring process and during the cleanup process. My best advice for this step is to get silicone happy! I am so obsessed with resin crafting that, when I see a kitchen tool in silicone, I am buying it. Even if I don’t have a particular use for it quite yet, I know that I will eventually find a way to use it with my resin artwork.
The reason silicone is so important for resin artists is that silicone and resin do not stick to each other. Silicone is the easiest surface to clean up after resin has cured because the cured resin just peels away from the silicone. Hence why we use silicone molds. I recommend you buy yourself kits like the one below, which includes silicone measuring cups, silicone stir sticks, and even gloves. These are cheap and great to have around for resin art because you can use them again and again!

$11.99 Rated 4.8 out of 5 by 8393 reviewers on Amazon.com
I cannot stress how important it is to make sure the surface you are working on is level! Use a level tool to check that your canvas sits flat on your workspace. This will prevent the epoxy resin from dripping out of the ring bezels during the curing process. It will also ensure your rings have a nice domed finish, instead of being lopsided.
As far as work surfaces go, make sure yours is covered with a silicone crafting mat. Check out Best Silicone Craft Mats for our top recommendations.
Importantly, you are going to need to hold your rings straight up somehow. The best method I have found for this is to use playdough. It is cheap and easy to work with. It also holds the ring bezels still when pouring your epoxy and is easy to adjust if needed. In the video, you see the rings I am working on sticking out of a mound of play dough.
How to Make a Play Dough Ring Stand to Hold Ring Bezels
- Take your play dough out of the container and roll it into a ball.
- Then, using a flat surface, smoosh (yes, technical, I know) the top of the ball down to the table.
- You will end up with a flat surface on the top that is just as level as your table if you push down with even pressure. However, you can use your level to measure the flattened surface to double-check.
- Once level, stick your ring bezels straight down into the play dough, ensuring your bezel stays parallel to the top of the mound.
- You can let the playdough sit for a while to dry out a bit. This may help hold the rings steadier.However, it is not required, as you can start your project immediately after putting the rings into the play dough.
Another way to hold your ring bezels steady for this project is with floral foam. Using the same technique as above, push your ring bezels into the foam. This method is also effective for holding your resin bezels steady during the resin pour.
Once you have protected your workspace, pulled out your materials, and secured your rings in their holder, you may move on to the next step.
2. Step Two: Background
Paint the Background of Resin Nature Rings

For this step, you can use either acrylic paint or epoxy appliance touch-up paint. Note that the appliance epoxy only comes in black and white, so if you are trying to make a more colorful ring, use acrylic paint. Using a small paintbrush or nail polish brush, paint the background of the ring bezels and let dry. Once dried, move on to step three.
3. Step Three: Embellishments
Add Dried Flowers, Crystals, Beads, etc. to Resin Nature Rings

Now for the fun part of this project. The options are pretty much endless when it comes to this part of the resin nature ring project. I have included links to dried flowers, crystals, and beads that work well as embellishments in these rings. However, you can encapsulate pretty much anything you can think of into these rings. (Size permitting, obviously.)
Play around with different embellishment positions and combinations until you find one you like. Keep in mind, many times less is more with embellishments, and a simple dried flower looks perfectly stunning! Once you have positioned your embellishments into each bezel, move into Step Four.
4. Step Four: Epoxy Resin
Mix Epoxy Resin and Pour into Ring Bezels
Check out How to Mix Bubble-Free Epoxy Resin for great tips.
 No matter the brand of epoxy resin you choose, you must follow the directions on the bottle. Most epoxy resins require a 1:1 ratio of epoxy resin and hardener. However, there are a few brands where this differs. Be aware of whether the directions call for a 1:1 ratio measured by weight or a 1:1 ratio measured by volume. Usually, mixing instructions call for measuring epoxy resin by volume. If this is the case, all you need is a plastic or silicone measuring cup.
Use Silicone or Plastic Products With Epoxy Resin
I suggest you buy a cheap silicone measuring cup, like the one found in the kit suggested in Step One.
Mix Thoroughly/Avoid A Sticky Mess
When mixing, be sure to mix thoroughly. You will know the product is mixed when you stop seeing strings of resin in the cup. Also, be sure to scrape the sides and bottom of the cup to ensure thorough mixing. If you do not do this, you may end up with sticky parts on your project.
Mix Slowly/Avoid Bubbles
Another great tip is to mix slowly. Mixing slowly helps prevent air bubbles in your epoxy resin.
Wooden Stir Sticks = More Bubbles
If you have issues with air bubbles, you may also want to switch up your stir stick. A wooden stir stick, being porous, may also introduce extra air bubbles into the epoxy resin while mixing. Using a silicone stir stick will prevent this problem.
For this project, I used Craft Resin, and it worked perfectly! (By the way, I am not sponsored by Craft Resin, in case you were wondering!) I completely recommend it for this project.
Another option, however, if you are less patient, is to use UIV Resin to make the resin nature rings. However, UV resin can be very finicky for beginners, as curing completely is tough, and achieving a shiny result can be even tougher. If you want to avoid a headache as a newbie, just use two-part epoxy resin. Waiting for the epoxy resin to cure is well worth it in the end!
Once you have mixed your epoxy resin completely, slowly pour the epoxy resin into the ring bezels. Be careful not to overfill the bezels. You do not want the epoxy resin to flow over the sides. Doing this step slowly will ensure a nice dome-like finish. If you do overflow the epoxy, be sure to wipe excess epoxy off the portions of the ring that are outside the bezel. It is difficult to remove excess epoxy after it has been cured.
Let your epoxy resin cure, and you are finished!
Final Resin Nature Ring Results
Here is how our resin nature rings came out! Good luck, and we would love to hear how your resin rings turn out. Please leave us a comment below, and do not forget to share this with your friends on social media! We sure do appreciate you.
Thanks for watching and reading. Please leave us a comment below and share this tutorial!


This is a really interesting post. Because I have loved this kind of work since I was a child. You have given detailed step-by-step instructions on how to make these Resin Nature Rings. It is very easy for me to follow along, without making mistakes. That is further clarified by the video.
We can color it anyway, right?
I will try this tomorrow.
Thanks so much for this post. Keep posting like this
Pasindu, I am so happy you enjoyed the tutorial, as well as the video! Yes, you may color these with whatever color you like. The possibilities are endless.
Just use acrylic paint to paint the base of the ring bezel and you are set. Put anything you want on top and then add the epoxy.
It is the epoxy resin that really finishes the piece off. It highlights the embellishment and makes the color pop!
I would love to see how your project turns out!
Brilliant idea and Great Instructional Video!!! These Resin Rings would be great for many different occasions as Unique Novelty Pieces. Utilizing a persons Horoscope as a center piece of the ring would also be popping. There are so many different things you can do when it comes to creating these rings.
Thank you for this idea you came up with!!!
Troy
Troy: It is so funny you say that! I actually have another tutorial where I put a horoscop=e sign in the middle of a small wooden slab and make a necklace! Almost like what you are taking about for a ring. If you are interested, check it out here. They are really neat because they glow in the dark, just like stars! Hope you have a great day!
I like that this is a beginner, do-it-yourself resin project. I’ve been thinking about what to do when I get together with friends, so this is a great project. I appreciate the video you posted showing us exactly how to do make these beautiful pieces of art. I’ll be sure to purchase the products from your links. Other than the ring bezels, the other products like playdough, acrylic paint and common things that can be easily found online. Lastly, I have a ton of silicone products so using silicone would work best for me as I don’t like heavy clean up. Thanks for this post.
Silicone is so versatile when working with epoxy resin. I literally buy anything I see that is silicone because I know it will be useful at some point in my artistic career. (Within reason lol) I am glad you and your friends are going to attempt this project. Have fun and I would love to see your results.
These rings are stunning and I am sure if you got good enough at making them you could sell them for quite a bit. I can’t believe that they can look so dainty as I always imagined epoxy art only being able to make bulkier items.
And so many great ideas on what you can put in your ring for a touch of nature or even add something personal as a gift. I am surprised thought that things like dried flowers keep their color once being submerged in the chemicals. Do they last or do you need to prep them in a certain way?
There are many ways to preserve dried flowers for encapsulation in epoxy resin to keep their color. A coat of modpodge or dried flower sealant works. Also, if you dry the flowers in silica gel, the colors do not seem to fade as much. However, none of this is really necessary. As long as your flowers are dried completely before you put them in the resin, they will maintain their color. Watch out for a post on this soon, with the launch of a new jewelry line made with real rose petals!
The wealth of knowledge on this site is truly awesome. The abiity to turn a passion into a business is incredible. I had never heard of making these rings at home. I have seen them, thought they were pretty, but not once did I think about the possibility of actually creating them. I love the fact that you show the process of making these rings in the video. These rings look like a product that teenagers would love. My grandaughter crochets and creates those bead bracelets with string.to earn extra money for senior fees, etc. I cannot wait to show her your website. I think she will love it.You could use your process to preserve flowers or to creave memorial pavers. The rings are beautiful Thank you for sharing your talent.
Wow, that is amazing that your granddaughter is such an inspiring and talented entrepreneur! You should be very proud of her! By the way, keep an eye out for the new Craftelot Resin Co. jewelry and trinkets collection that is dropping soon. It will showcase a lot of preserved flowers!!