Essential Resin Art Supplies for Beginners and Professionals
Resin art is a versatile and beautiful medium that has become increasingly popular in recent years. Whether you’re a seasoned resin artist or a beginner, having the right resin art supplies is essential to creating beautiful, high-quality pieces. In this article, we will discuss the essential resin art supplies that every artist should have in their toolkit.
1. Epoxy Resin
Epoxy resin is the foundation of resin art. It is a two-part system that consists of a resin and a hardener. When mixed together, they create a durable, clear coating that is perfect for creating a variety of resin art pieces.
For more information on what epoxy resin is and how it is used for art, check out Best Epoxy Resin For Art Projects–Everything You Need To Know
For beginners and professionals alike, I recommend Craft Resin Epoxy Resin. You will receive ten percent off your order if you use the link below! Craft Resin is a 1:1 epoxy resin to hardener product and it is great for artwork. It is crystal clear and has a long working time, which is ideal for creating!

Link for UK Readers:
Use code CRAFTELOTRESINCO for 10% OFF your purchase.
Link for US Readers:
Use code CRAFTELOTRESINCO for 10% OFF your purchase.
2. Pigment Powders, Resin Dyes, Alcohol Inks
(Resin Colorants)
Pigment powders, resin dyes, and alcohol inks are all used to color to resin. They come in a wide range of colors and can be mixed together to create unique custom shades.
When selecting pigments or dyes, it’s important to consider their compatibility with your epoxy resin formulation. Some pigments or dyes may not work well with certain types of epoxy resin or may affect the curing time or final outcome of your piece. Additionally, some pigments or dyes may be more opaque or transparent than others, so be sure to consider the level of transparency or opacity you want in your piece.
For a full list on the different items that you can use to color your epoxy resin, check out What can you use to color epoxy resin?
Pick any of the colorants recommended in the article above for your first-time project and you will have success.
3. Mixing Cups and Stir Sticks (Plastic or Silicone)
Epoxy Resin must be mixed thoroughly and precisely to achieve the desired results. Mixing cups and stir sticks are essential to ensure accurate measurements and proper mixing.
Graduated cups with visible markings help to measure the correct amounts of resin and hardener, while stir sticks help to mix the two components thoroughly.
I suggest ordering a kit with stir sticks and silicone mixing cups included. The great part about these kits is that they have multiple different-sized mixing cups so you can use the big one to mix up a big batch of resin and the smaller ones to mix your colors into the resin.
SIlicone is the best option for epoxy resin because you can leave the resin in it until it cures, making clean up a breeze. Once the epoxy resin has cured, you can peel it right out of the silicone cups and off of the stir sticks. (Plastic works the same way as silicone, but it will not last as long.)
The trick is to buy high-quality (but still affordable) silicone mixing/stirring kits. Here are a few of my top recommendations (I have used each and loved them!):
4. Heat Gun or Torch
A heat gun or torch can be used to remove air bubbles that form during the mixing and pouring process. This is important for achieving a smooth, glass-like finish on your resin art pieces.
When using a heat gun or torch, be sure to use it carefully, briefly applying heat to your epoxy resin. Applying too much heat or holding the heat gun or torch too close to the resin can cause it to burn or bubble. This is a bummer, trust me. If you’re using a mold, it is best to use a heat gun, as a torch may ruin your mold. However, too much heat from either a heat gun or torch on a silicone mold can ruin your mold. Just be gentle and you will be fine!
Additionally, be sure to use a heat gun or torch in a well-ventilated area and avoid inhaling any fumes or smoke.
For a great, affordable heat gun to use fo rresin art, that comes with all the tips you need to create beautiful effects, I suggest the Seekone Heat Gun Kit below. If you are making smaller projects, you can go with the

Seekone Heat Gun Kit
Prulde Hot Air Gun
Here are some options for torches if you want to go the more affordable route or are only looking to do a couple art projects.

Infinity Dual Flame Torch
Sondiko Dual Flame Torch
Master Appliance Torch with Butane
5. Resin Molds
A resin mold or form is used to create specific shapes or designs with your resin. They come in a variety of shapes and sizes and can be reused multiple times.
When selecting a resin mold consider the size and shape of the piece you want to create. Some molds or forms may be better suited for small, intricate pieces, while others may be better suited for larger pieces. Additionally, consider the material of the mold or form. Silicone molds are more flexible and easier to remove the resin from, while plastic molds may be more rigid and durable.
Check out 32 Best Silicone Molds for Resin: You Made WHAT From Resin? for some amazing molds, all vetted and recommended highly by yours truly!
If you are looking to make resin coasters, check out 16 Best Silicone Coaster Molds for Resin Art to see my suggestions for coaster molds.
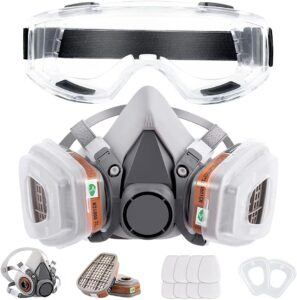
6. Gloves and Safety Gear
When working with epoxy resin, it is important to wear protective gloves and safety gear such as goggles or a mask. This will protect your skin and eyes from exposure to potentially harmful chemicals.
When selecting gloves and safety gear, be sure to choose items that are appropriate for the type of epoxy resin you are using. Some gloves and safety gear may be better suited for use with certain types of resin, such as UV-resistant or heat-resistant epoxy resin. Additionally, be sure to follow the manufacturer’s instructions for using and disposing of gloves and safety gear.
For more information on the health hazards associated with epoxy resin, check out Is Epoxy Resin Hazardous to Your Health?
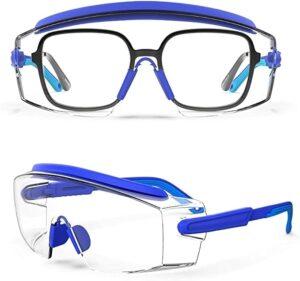
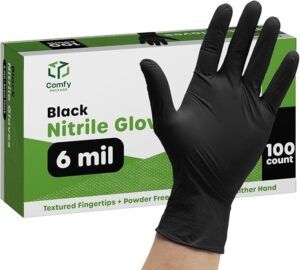
Here are my top recommendations for safety gear for epoxy resin artists:
Respirator: 
Goggles/Shop Glasses:
Nitrile Gloves:
7. Sandpaper or DeBurrer
Once your resin has cured, you may need to sand the surface to remove any rough spots or blemishes. Sandpaper comes in a variety of grits and is an essential tool for achieving a smooth finish on your resin art pieces. When selecting sandpaper, consider the grit level you need for your project. Lower grit sandpaper (such as 80 grit) is more coarse and is better suited for removing rough spots or blemishes. Higher grit sandpaper (such as 400 grit) is finer and is better suited for achieving a smooth, polished finish. Additionally, consider the type of material you are sanding.
Sanding is something most resin artists’ dread. This is because when you sand your resin it loses its shine, and you can only get the shine back in two ways. The first involves sanding your pieces with increasing grits until you hit a very high grit. For example, if you start with an 80-grit sandpaper to level out any imperfections on your resin art surface, you will need to increase your grits by 100, 250, 300, 400, 500, 600, 800, 1000, 1050, and sometimes even up to 3000 and 4500. The other way you can get the shine back after sanding is to do a flood coat of epoxy resin. After sanding with any girt, applying a flood coat will take away any scratches caused by your sanding. This is the recommended technique to save time, but it may not be possible for all projects. If you end up having to use the sandpaper method, be sure to buy a kit like the following to make sure you have all the grits you need!
Atosun Wet Dry Sandpaper Kit (120-5000 grit)

A deburring tool is anothe rmust have tool for the resin artists toolkit. This tool is especially useful for resin coaster and resin jewwelry projects, but can be used for any projets that is made using a mold. When epoxy resin is casted into a mold the edges can be very sharp when you demold teh casting. A deburring tool allows you to easily cut these edges down so you end up with a smooth, dull edge on your castings. You do not have to sand the edges if you use this tool so you are really saving a lot of time for just a little bit of money! Here is the tool I use:
Deburring Tool for Resin Art

8. Resin Drying Machine
Resin artists use resin drying machines to speed up the curing process of their resin art pieces. A resin drying machine typically uses heat and air circulation to dry or cure the resin more quickly than would be possible at room temperature. This can be particularly useful for artists who need to complete their pieces quickly, or for those of us who are just impatient and would like to cut the cure time in half!
Using a resin drying machine can also help prevent dust or other particles from settling on the surface of the resin as it cures, which can create an uneven or bumpy surface. Additionally, a resin drying machine can help reduce the amount of time the resin is exposed to air, which can help prevent bubbles or other imperfections from forming in the resin.
Here is the resin drying machine I have been using on my small pieces lately. It surely is a handy little machine!
Teexpert Resin Quick Cure Machine

9. Gilding Marker or Metallic Paint Pens
Resin artists use metallic markers to add fine details and accents to their resin art pieces. Metallic markers come in a variety of colors and can be used to create metallic finishes on top of the resin surface. They can be used to create intricate designs, add highlights, or write text on the surface of the resin. Metallic markers are particularly useful for creating fine details on small or intricate pieces, such as jewelry or keychains. They can also be used to add metallic accents to larger pieces, such as resin art paintings or furniture. My favorite way to use these markers is on the edges of my resin coasters. It gives the coaster a rich look, almost like it has a metal edge. Notably, certain brands are much more effective for achieveing this metal look. I use one brand only because I have not like the look of the other brands I have tried. I will include links to the metallic markers I swear by below! Overall, metallic markers are a versatile tool for resin artists looking to add a metallic touch to their work.
DecoColor Gold Metallic Marker

DecoColor Silver Metallic Marker

DecoColor Copper Metallic Marker

DecoColor Rose Gold Marker

DecoColor Metallic Marker Full Kit

10. Leveling Plate
A leveling plate is important for resin art because it helps ensure that the surface on which the resin is being poured is level. If the surface is not level, the resin may pool in certain areas, creating uneven thickness and potentially ruining the piece. A leveling plate allows you to adjust the level of the surface before pouring the resin, ensuring that it will flow evenly and create a smooth, level surface. This is especially important for larger pieces or pieces with multiple layers, where even slight variations in levelness can become more apparent. A leveling plate can also help prevent any resin from dripping off the edges of the surface, which can cause mess and waste material. Overall, a leveling plate is a useful tool for achieving professional-looking resin art pieces.
Leveling Plate for Resin Art

In conclusion, resin art supplies are essential for any resin artist. Investing in high-quality supplies will not only help you achieve better results but also ensure your safety during the process. Make sure to have all the necessary resin art supplies to create beautiful and unique resin art pieces that will be admired for years to come.
Please do not hesitate to leave any questions in the comment section below!