The Art of Resin Crafting: Tips and Tricks for Beginners
Resin crafting has become one of the most popular DIY hobbies in recent years, and it’s not hard to see why. Resin is a versatile and exciting medium that can be used to create all sorts of unique and beautiful pieces, from jewelry to home decor. If you’re new to the world of resin crafting, it can seem intimidating at first, but with a few tips and tricks, you’ll be creating stunning resin pieces in no time.
Resin Crafting Tip #1: Choose the Right Resin
Choosing the right resin is crucial to the success of your project. There are different types of resin available, including epoxy resin, polyester resin, and polyurethane resin. Epoxy resin is popular because it dries clear, has a glossy finish, and is durable. On the other hand, polyester resin is less expensive and sets up quickly, but it can yellow over time. Polyurethane resin is a bit more flexible and can be used for outdoor applications. Research the different types of resin to find the one that best suits your needs.
For resin rafting, it is almost always best to use epoxy resin. For more information on why, including an in-depth look at what epoxy resin is and why it works so well for art, check out Best Epoxy Resin For Art Projects–Everything You Need To Know
For an easy graph showing you which epoxy resin is best for your specific resin art project or craft, check out Epoxy Resin Chart: Easily Compare Different Resins for Art
For a list of my favorite epoxy resins, including in-depth reviews of each, check out What Epoxy Resin to Buy: Recommendations for Resin Artists
Resin Crafting Tip #2: Measure Carefully
Resin crafting requires precise measurements, so invest in a good set of measuring cups and a scale. Follow the manufacturer’s instructions carefully, as the mixing ratios can vary depending on the type of resin you’re using. Mixing resin incorrectly can cause it to remain tacky, have bubbles, or not cure properly.
I recommend purchasing measuring cups with measurements on the side. It is best to purchase silicone measuring cups. Here are my favorite sets of measuring cups and stir sticks to get you started with resin art:

Buy NicPro Resin Art Measuring Starter Kit Here

Buy Let’s Resin Art Measuring Starter Kit Here
Resin Crafting Tip #3: Protect Your Workspace
Resin is messy, so it’s essential to protect your workspace. Cover your table with a plastic tablecloth or newspaper and wear gloves to avoid getting resin on your skin. If you’re working on a large project, consider using a silicone mat or a plastic drop cloth to contain the resin.
For my top silicone mat recommendations, check out Best Silicone Craft Mats For Resin Artists
Resin Crafting Tip #4: Practice Patience
Resin can take up to 24 hours to cure, so it’s essential to be patient. Rushing the curing process can result in a sticky or uneven finish. Make sure you have enough time to work on your project and let it cure fully before handling it.
Resin Crafting Tip #5: Experiment with Color and Additives
Resin can be mixed with different pigments and additives to create unique effects. Experiment with different colors and add glitter, beads, or other embellishments to your resin pieces. However, be cautious when adding materials to your resin, as it can affect the curing process and result in a faulty final product.
For the ultimate list of what can be safely added to epoxy resin, and which additives create the coolest effects, check out What can you use to color epoxy resin?
Resin Crafting Tip #6: Use a Torch to Eliminate Bubbles
Bubbles are a common issue in resin crafting, but they can be eliminated by using a torch or heat gun. After pouring the resin into your mold, use a torch or heat gun to pass it over the surface of the resin. The heat will cause any bubbles to rise to the surface and pop, resulting in a smooth finish.
Here are my top recommendations:

Infinity Dual Flame Torch

Sondiko Dual Flame Torch

Master Appliance Torch with Butane
Resin Crafting Tip #7: Sand and Polish Your Resin Piece
After your resin piece has cured, it’s time to sand and polish it. Sand the surface with fine-grit sandpaper to remove any imperfections, then polish it with a polishing compound to give it a glossy finish.
Atosun Wet Dry Sandpaper Kit (120-5000 grit)

Resin Crafting Tip #8: Store Your Resin Properly
Resin has a shelf life, and it’s essential to store it properly to prevent it from expiring. Keep your resin in a cool, dry place, away from direct sunlight, and make sure the lid is tightly closed to prevent air from getting in.
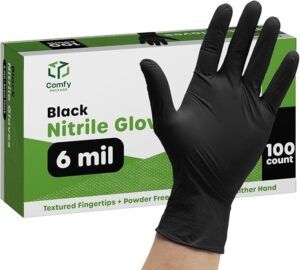
Resin Crafting Tip #9: Safety Precautions
Resin can be hazardous if not handled properly. Always wear gloves and a respirator mask when working with resin to protect your skin and lungs. Work in a well-ventilated area to prevent the buildup of fumes. It is also important to use epoxy resin for art that focuses on artist safety. All of the recommendations here are made by companies that consider the health of the resin artist a top priority.
For more information on the health effects that you can experience from using epoxy resin without the proper safety gear, check out Is Epoxy Resin Hazardous to Your Health?
Here are my most highly recommended safety products for resin artists:
Respirator: 
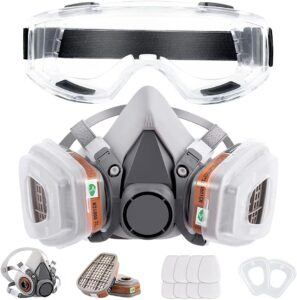
Goggles/Shop Glasses:

Nitrile Gloves:
Resin Crafting Tip #10: Allow the Resin to Cure
Once you have poured the resin, you need to let it cure. The curing time can vary depending on the type of resin and the ambient temperature and humidity, but it typically takes 24 to 72 hours. Be sure to follow the manufacturer’s instructions for the recommended curing time.
Resin Crafting Tip #11: Demold the Resin
After the resin has cured, you can remove it from the mold. Depending on the mold and the resin, you may need to apply some pressure or gently flex the mold to release the resin. If the resin has not cured completely, it may stick to the mold, so be patient and avoid using excessive force.
Resin Crafting Tip #12: Add Finishing Touches
To add some extra flair to your resin creation, consider adding some finishing touches. You could add some glitter, paint, or other embellishments to enhance the design. Just be sure to let each layer of the finishing touches dry before adding the next layer.
Resin Crafting Tip #13: Display or Use Your Resin Creation
Finally, you can proudly display or use your resin creation. Whether it’s a jewelry piece, a coaster, or a decorative object, your resin creation is sure to be a unique and eye-catching addition to your collection!
In conclusion, resin crafting is a fun and rewarding hobby that allows you to create beautiful and unique pieces. By following these tips, you can ensure that your resin creations turn out beautifully every time. So gather your materials, get creative, and have fun with resin crafting!


I think it was about 50 years ago that I had a resin kit to make a chess set. I was a teen at the time. I wish tips like these were available that I could use to get better results. If I remember correctly, the results of my attempts were less that stellar. I think at the time i didn’t realize the importance of the details like you have given here. Do you find a lot of teens today like to get into the resin craft? I wonder if my teenage granddaughters would enjoy this. They usually like to try new things, so I will show them your website!
Absolutely! I have seen all different ages get into resin crafting, but it is especially fun for teenagers. Some of the things that are popular to make in the resin crafting worlds are particularly suitable for teenagers. Have them check out 32 Best Silicone Molds for Resin: You Made WHAT From Resin? if they wish to find some really cool ideas of projects to get started with. I believe I included a link to a chess set mold in that article as well, so maybe you can give it a second try! If you need any recommendations for types of resin to purchase for specific projects or great beginner resin cart kits, check out Best Epoxy Resin For Art Projects–Everything You Need To Know.
Thanks for stopping by!
As someone who has recently taken an interest in resin crafting, I found your blog post to be a fantastic guide for beginners. You provide valuable tips and tricks on everything from selecting the right materials to troubleshooting common issues that can arise during the crafting process in a way I find to be rewarding. I am definitely sharing this post on my Facebook account. Thanks heaps for this.
Dave, thanks for stopping by! We would love to see your creations once you get started so keep in touch!
This is the guide I’ve been looking for! Thank you for the useful tips and links. I absolutely adore resin art and would love to try my hand at it at some point in the near future; but until then, I’m planning on ordering a few custom pieces from you.
So glad this was helpful to you! Please let me know if you want to do a custom order. Email me at craftelotresinco@gmail.com. Also, would be glad to answer any further questions you have when you get started crafting.