Create Spooky Halloween Resin Candy Dishes—Step-by-Step Tutorial
Crafting Halloween Candy Dishes with Resin Art
A Spooktacular DIY Tutorial for Creating Glow-in-the-Dark Pumpkin and Candy Corn Candy Bowls
Get ready for a Halloween filled with creativity and fun! In this step-by-step tutorial, we’ll guide you through crafting your very own Halloween-themed resin candy dishes that are perfect for adding a festive touch to your celebrations. Whether you’re an experienced crafter or looking for a family-friendly activity, these adorable glow-in-the-dark pumpkin and candy corn candy bowls are sure to delight.
Learn how to:
- Create a pumpkin or candy corn shape using a simple outline
- Add a mesmerizing glow-in-the-dark effect to your candy dishes
- Use UV resin for quick results or epoxy resin for a durable finish
- Showcase your crafting skills with intricate details like pumpkin faces
- Finish with a flood coat for a glossy and professional look
Join us in making this Halloween extra special with your unique resin art creations. Let’s dive into the step-by-step process and get started on your spooktacular candy dishes!
Share your stunning resin crafts with us on social media:
- Facebook: @CraftelotResinCo
- Instagram: @CraftelotResinCo
Halloween Candy Dishes: Materials
Wooden Serving Bowl (Tulip Shape)
Epoxy Resin (Craft Resin) Use code CRAFTELOTRESINCO for 10 % Off!
Vibrant Paints: Pumpkin Orange, Golden Yellow, White, and Green
Step-by-Step Halloween Candy Dishes Tutorial
Step 1: Prepare the Wooden Bowl and Create Halloween Shape Outline
Learn how to create your Halloween candy dishes with precision and style:
- Start by selecting a wooden bowl with a flat bottom. This ensures your candy dish will have a flawless shape.
- Apply liquid latex to the bottom of the bowl to prevent any resin from leaking out during the crafting process.
- To prep the wooden bowl, it helps to use liquid latex, however, this is optional. Spread liquid latex into the bowl, avoiding the center where your Halloween shape will lie. Tip: When drawing your Halloween shape with hot glue, try to put hot glue over latex for easy removal. See the video tutorial below to see exactly where to put the latex. Allow the latex to dry completely before adding your hot glue.
- Trace your desired Halloween shape onto the bowl using either a stencil or your own artistic touch.
- Enhance the outline by carefully creating a hot glue border around it. This border acts as a barrier for your resin, preventing any unwanted overflow.
Follow these steps to set the foundation for your Halloween candy dish masterpiece.
Step-by-Step Halloween Candy Dishes Tutorial
Step 1: Prepare the Wooden Bowl and Create Halloween Shape Outline
Learn how to create your Halloween candy dishes with precision and style:
- Start by selecting a wooden bowl with a flat bottom. This ensures your candy dish will have a flawless shape.
- Apply liquid latex to the bottom of the bowl to prevent any resin from leaking out during the crafting process.
- With a pencil, trace your desired Halloween shape onto the bowl using either a stencil or your own artistic touch.
- Enhance the outline by carefully creating a hot glue border around it. This border acts as a barrier for your resin, preventing any unwanted overflow.
Follow these steps to set the foundation for your Halloween candy dish masterpiece.
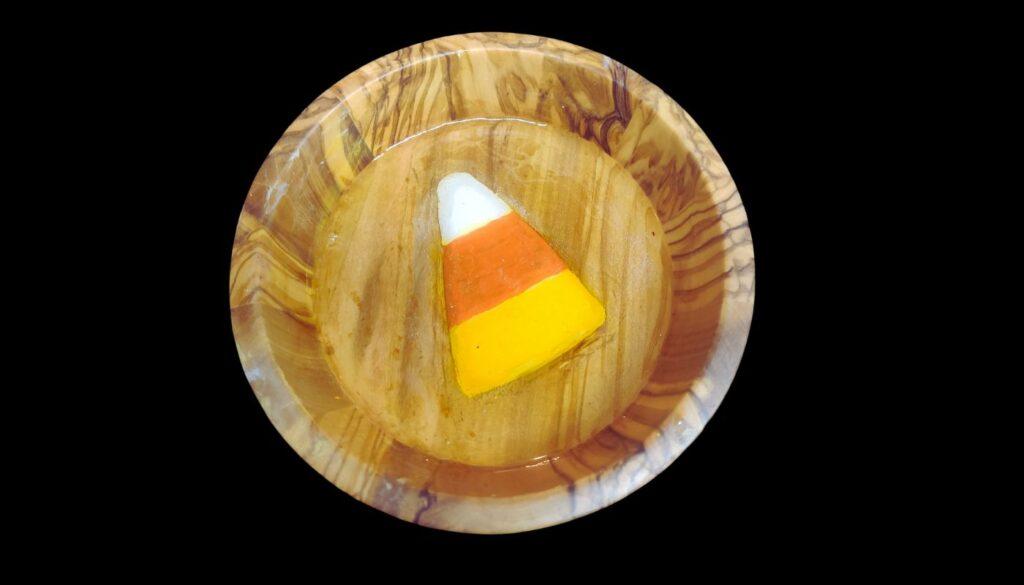
Step 2: Craft a Mesmerizing Pumpkin Face
Elevate your candy dish with an enchanting pumpkin face:
- If you’re opting for a pumpkin shape, use a silicone mat and a hot glue gun to trace each facial feature. Get creative by designing eyes, a nose, and a mouth that suit your spooky vision.
- Note: This step is only necessary if you have chosen to make a pumpkin shape in your bowl and you want the pumpkin to have a carved face. For example, you will make three triangle shapes for the eyes and nose and then whichever shape you would like for the mouth of the pumpkin. Warning: The hot glue will not detach easily from this silicone mat, so do not expect to use the mat again, unless you are making more pumpkin faces! I suggest using UV resin to fill your face molds, as it will save you time. However, you may also use epoxy resin.
- See the video tutorial below for clarification.
- Create your pumpkin face using UV resin mixed with orange glow powder. This will add a captivating glow-in-the-dark effect.
- Pour the UV resin mixture into the face molds and cure it using a UV light for just the right amount of time.
- Once cured, carefully demold and trim the face parts to fit perfectly within your pumpkin shape.
Master the art of crafting a bewitching pumpkin face to give your candy dish a mesmerizing touch.
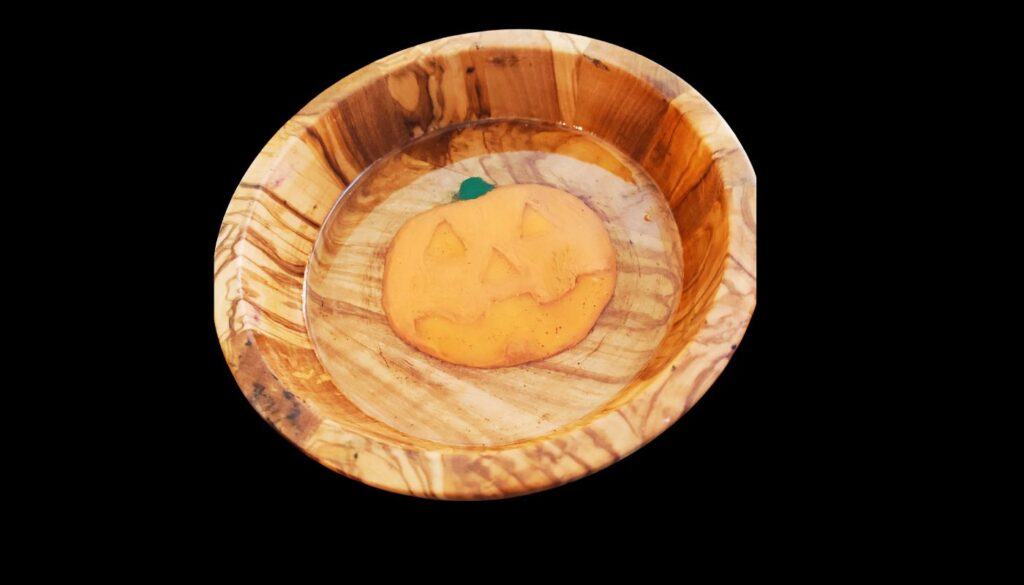
Step 3: Mix, Color, and Pour Epoxy Resin for Vibrant Depth
Add vibrant colors and depth to your candy dish with epoxy resin:
- Follow the instructions provided with your epoxy resin to achieve the perfect mixing ratio.
- Select a rich and bold acrylic paint color to add vibrancy to your candy dish. Mix the paint thoroughly into the epoxy resin until the color is consistent.
- Carefully pour the colored epoxy resin into the previously outlined Halloween shape. Ensure the epoxy resin fills the outline without overflowing.
- If you’re creating a pumpkin candy dish with a face, allow the epoxy resin to partially cure before placing the face castings onto the resin. This will create a realistic carved effect.
Transform your candy dish into a captivating work of art with beautifully colored epoxy resin.
Step 4: Refine Shape and Remove Hot Glue
Clean up your candy dish for a polished finish:
- Gently remove any excess epoxy resin that may have seeped beyond the outline using a precise craft knife or sandpaper.
- Detach the hot glue border that was used to contain the resin. If you applied liquid latex, carefully peel it off to reveal the clean edges of your Halloween shape.
- If needed, sand the top surface of the epoxy resin to create a smooth and even finish for the next step.
Prepare your candy dish for the final steps by removing any imperfections and ensuring a polished appearance.
Step 5: Apply the Glossy Flood Coat
Give your candy dish a glossy and professional finish:
- Wipe down the candy dish to remove any dust or debris from the surface.
- Mix a small batch of epoxy resin according to the manufacturer’s instructions.
- Carefully pour the epoxy resin over the entire surface of the candy dish, ensuring an even and complete coverage.
- Use a heat gun or a torch to remove any air bubbles that may have formed on the surface of the epoxy resin.
- Allow the epoxy resin to cure completely, following the recommended curing time provided by the manufacturer.
Enhance your candy dish with a stunning glossy finish that adds a professional touch to your creation.
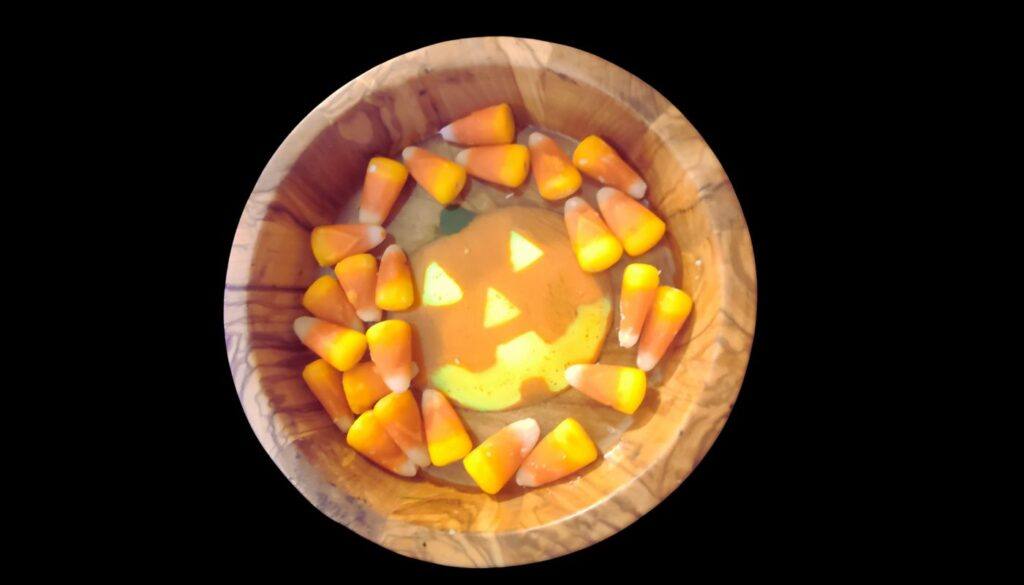
Step 6: Showcase Your Spooktacular Halloween Candy Dish
Put the finishing touches on your candy dish and proudly display your creation:
- Inspect the candy dish for any remaining imperfections or rough edges. Sand or trim as needed to achieve a flawless appearance.
- Add decorative elements such as ribbon, gems, or other embellishments to enhance the Halloween theme.
- Place your Halloween candy dish in a prominent location to showcase your handcrafted masterpiece.
- Share your creation on social media and with friends and family to spread the Halloween spirit!
Your Halloween candy dish is now ready to delight and impress your guests!
Halloween Candy Dishes: Video Tutorial
Craft Your Spooktacular Halloween Candy Dishes Today!
Unleash your creativity and celebrate Halloween with these mesmerizing candy dishes. With our step-by-step tutorial, you’ve learned how to transform simple wooden bowls into enchanting works of art that will delight both young and old.
From crafting captivating pumpkin faces to adding vibrant epoxy resin colors, you’ve mastered the art of creating unique and eye-catching candy dishes that will impress your guests.
As you proudly display your handcrafted candy dishes, remember to share your creations with us on social media and tag us at @CraftelotResinCo. We can’t wait to see your spooktacular creations!
Thank you for joining us on this creative journey. We hope this tutorial has inspired you to explore the world of resin art and make this Halloween truly special.
Happy crafting and happy Halloween!


Halloween is around the corner so this is the perfect time to make an article. In my country (South Africa), we are not known to celebrate Halloween. Maybe because we are not aware of what it is or we have a negative outlook on it. This is something I would definitely show my family as they are more open to the idea of Halloween.
The neat part about this project is that it can be tweaked a bit to fit any sort of celebration, or even just any hobby! For example, if you have a friend who loves basketball, you could make a dish with a basketball in the middle. Or if you have a friend who is a dentist, you could put a tooth in the middle! Literally the possibilities are endless!
Thanks for stopping by!
A very timely website to find. You provide a lot of great information and easy to follow instructions. I think it is a great idea to do it yourself but my only concern is, are the materials used safe to be in contact with food that kids are going to eat? Also are the materials used easy to find in local stores, or do you need to go to a specialty art store?
Thanks
Stephen
Great questions Steve! So, all the epoxy resin I recommend for projects that come in contact with food are FDA approved to be food safe after they have cured. So, once cured, there is not issue with safety. Also, the epoxy resins I recommend do not have any VOCs, and very few fumes. So, short amounts of contact time while mixing is not going to be incidental to your health, however, you could do that part of the project for the child incase. It is kind of difficult to make sure the epoxy resin is mixed completely anyway, so I would suggest that either way!
If you have further concerns, check out Best Epoxy Resin For Art Projects–Everything You Need To Know. I have also put together an Epoxy Resin for Art Comparison Chart (reference guide) that lists all the safety specs for some of the most popular epoxy resin for art brands on the market today.
You can find all the supplies needed at your local craft store, like Michaels or Hobby Lobby. However, I suggest ordering the products on Amazon, especially the epoxy resin, using the links provided above, as I have found products that are priced much more affordably than they are in the store.
As one of the most popular holidays for children, having Halloween crafts they can make is an awesome idea. I am often wondering how to encourage my children, and to complete bonding activities together. You have just provided wonderful ideas for this season. I suppose that incredible ideas like this with such terrific steps of instruction could be done for other celebrations also. Do you plan on doing the same for other holidays?
Absolutely, these bowls can be adapted for Christmas, Easter, Birthdays, New Years, etc. Just change up the designs in the middle. For example, you could make a Christmas tree, a rabbit, an Easter egg, a birthday cake, or even a star for new year’s! Have fun with it. The kids love it, but they also make really cute decorations and candy dishes for adults. People love to see them on my desk at work during the holidays! It helps that I put little candy corns and pumpkin candies in the dishes as well. 🙂
I am so glad I came across this article. My daughter and her Girl Scout troops are looking for a Halloween arts and crafts project that they could do for the senior homes in our area. This article mainly highlights a perfect project very easy to fall as the girls can do for the seniors but also for parents with young kids who want to engage him in a fun Halloween activity
Thank you so much for this article it’s very timely and very interesting thank you for this article!
-Mike
Mike- What a great idea! I love that your kids are doing community service like this. Seniors would absolutely love to receive one of these amazing gifts from your kiddos! Please let me know if you would like me to send you a list of affordable materials the girls could use to make these. It might be best to buy these materials in bulk if you have a big troop!